Preguntas Frecuentes - FAQ
How to create/edit separate Cpanel accounts from WHM as an Ionblade reseller Imprimir éste Artículo
If you want separate Cpanel accounts to keep your websites organized or to give access your client/developer please follow the steps below.
To do this you must create new accounts from within WHM by following the instructions below. To learn how to access WHM see: How to access/manage your hosting account/s
Note: If you want to grant users access to WHM to manage all Cpanel accounts see: How to add contacts or sub accounts
1.) Once logged into WHM type "account" into the search bar on the top left, this will quickly filter the menu to display "Create a New Account" below for you to click on it.
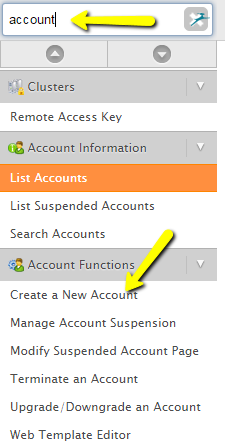
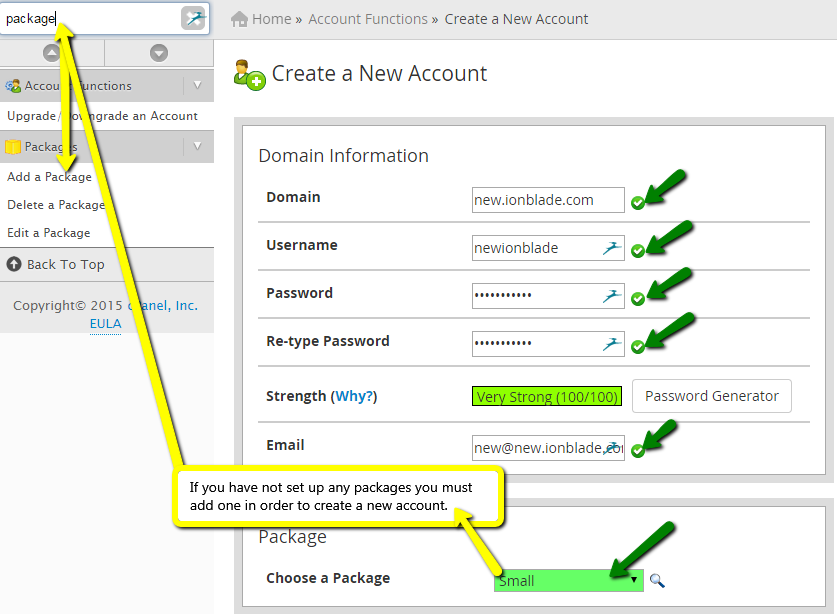
2.) On the "Create a New Account" page insert the domain you wish to add to the account
***Note*** this can be any domain as long as it does not exist on the Ionblade server you are using. See this article to learn how to access a domain on your IP without it being live on internet: How to test your website on Ionblade's server with your computers "hosts" file).
Next, enter the username (normally auto filled) and password for the Cpanel account. These are the credentials you will share with your client or developer.
The email address for the new account will be used to send Cpanel notifications for that account, for example application updates and backups.
In order to create a new account you will also need to select a pre-created package (package create resource limits for individual Cpanel accounts to give you more control over your users. If you do not have any packages configured start to type "package" into the top left search bar until you can click on "Add a Package". If you Already have packages configured jump to step 4.)
Once you give your client or developer the Cpanel username and password they can access the panel by entering their credentials at this url: https://host1.ionblade.com:2083
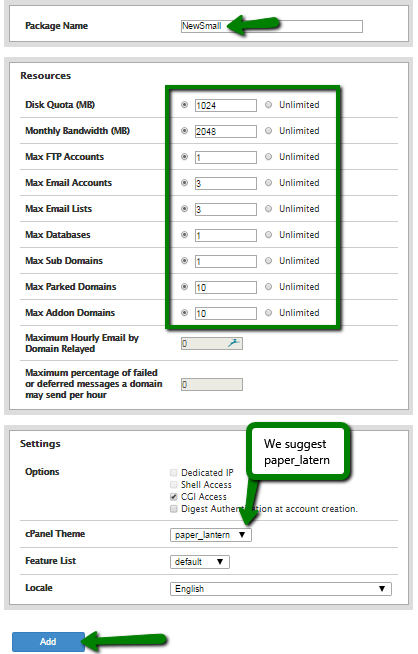
3.) To create a package give it a unique name, set the resource limits, default Cpanel template, and feature list then click add (the only option we recommend changing in the settings section is the Cpanel template).
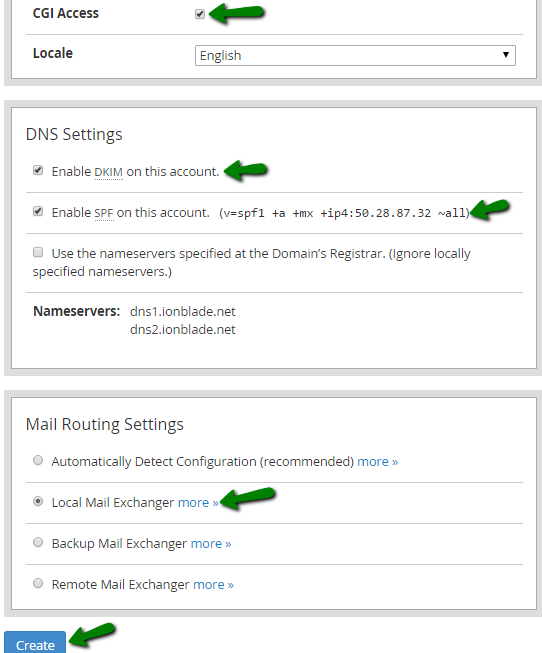
4.) To finish creating a Cpanel account, make sure the following checkboxes are selected (they should be by default) with the exception of mail server. If you are going to use an outside mail server such as Google’s, set this to remote mail exchanger, otherwise leave it as default (you can also select automatic if you’re not sure), then click create.
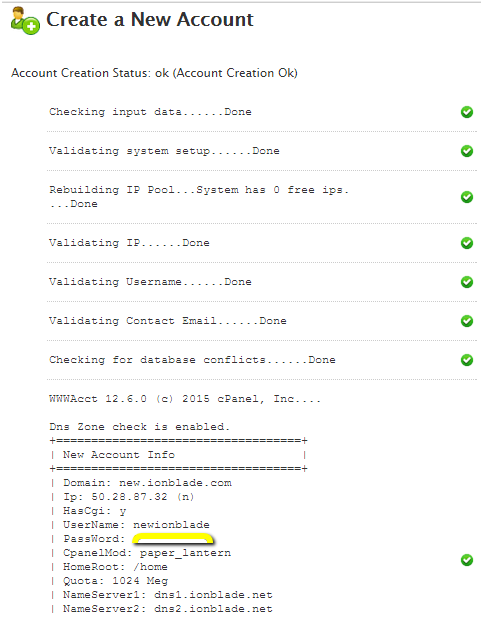
5.) When the account is created successfully you will see green check marks and a summary of the account settings (this will also be emailed to the email address set earlier but the password field will be masked).
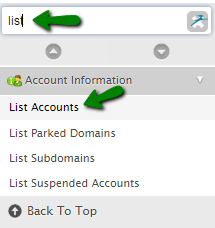
6.) To find the account you just created or any other account in your WHM start to type "list" into the search bar on the top left till you can click on "List Accounts".
7.) After you click on "list accounts", all your Cpanel accounts will display on the right (if you have multiple accounts you can find them quickly by typing part of the domain in the search bar that is located above your accounts and click find). Once you find the account you wish to access, click on the blue Cpanel icon to log in. (Note: You can only access one account at a time)

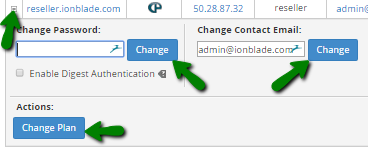
8.) If you want to change the password of an account or the admin email click the plus button to the left of the domain, enter the new data and click change. If you want to change an accounts package, click change plan.
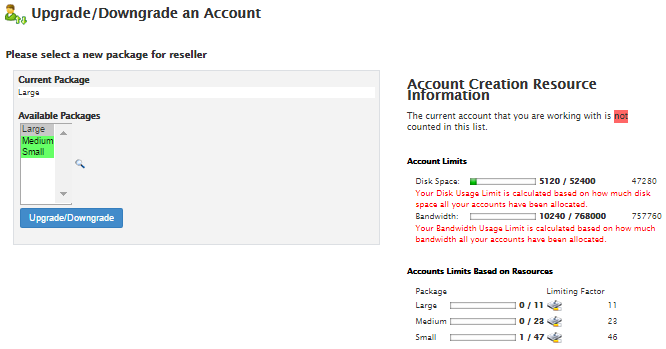
9.) When you change a plan you must have another package to choose from. If you need help creating another package please reveiw step 3, otherwise click on the package you want and click "Upgrade/Downgrade" (this does not upgrade or downgrade your reseller account, only the individual Cpanel accounts you manage). You will see the total amount of space you have allotted to your accounts compared to the total amount of space your reseller account has available.
To do this you must create new accounts from within WHM by following the instructions below. To learn how to access WHM see: How to access/manage your hosting account/s
Note: If you want to grant users access to WHM to manage all Cpanel accounts see: How to add contacts or sub accounts
1.) Once logged into WHM type "account" into the search bar on the top left, this will quickly filter the menu to display "Create a New Account" below for you to click on it.

2.) On the "Create a New Account" page insert the domain you wish to add to the account
***Note*** this can be any domain as long as it does not exist on the Ionblade server you are using. See this article to learn how to access a domain on your IP without it being live on internet: How to test your website on Ionblade's server with your computers "hosts" file).
Next, enter the username (normally auto filled) and password for the Cpanel account. These are the credentials you will share with your client or developer.
The email address for the new account will be used to send Cpanel notifications for that account, for example application updates and backups.
In order to create a new account you will also need to select a pre-created package (package create resource limits for individual Cpanel accounts to give you more control over your users. If you do not have any packages configured start to type "package" into the top left search bar until you can click on "Add a Package". If you Already have packages configured jump to step 4.)
Once you give your client or developer the Cpanel username and password they can access the panel by entering their credentials at this url: https://host1.ionblade.com:2083

3.) To create a package give it a unique name, set the resource limits, default Cpanel template, and feature list then click add (the only option we recommend changing in the settings section is the Cpanel template).

4.) To finish creating a Cpanel account, make sure the following checkboxes are selected (they should be by default) with the exception of mail server. If you are going to use an outside mail server such as Google’s, set this to remote mail exchanger, otherwise leave it as default (you can also select automatic if you’re not sure), then click create.

5.) When the account is created successfully you will see green check marks and a summary of the account settings (this will also be emailed to the email address set earlier but the password field will be masked).

6.) To find the account you just created or any other account in your WHM start to type "list" into the search bar on the top left till you can click on "List Accounts".

7.) After you click on "list accounts", all your Cpanel accounts will display on the right (if you have multiple accounts you can find them quickly by typing part of the domain in the search bar that is located above your accounts and click find). Once you find the account you wish to access, click on the blue Cpanel icon to log in. (Note: You can only access one account at a time)

8.) If you want to change the password of an account or the admin email click the plus button to the left of the domain, enter the new data and click change. If you want to change an accounts package, click change plan.

9.) When you change a plan you must have another package to choose from. If you need help creating another package please reveiw step 3, otherwise click on the package you want and click "Upgrade/Downgrade" (this does not upgrade or downgrade your reseller account, only the individual Cpanel accounts you manage). You will see the total amount of space you have allotted to your accounts compared to the total amount of space your reseller account has available.

¿Fue útil la respuesta?
Artículos Relacionados
Why didn't my email get delivered, where did my email go, email problems, email bounce, or email daemon?
Using cpanel, Technical Analysts will get asked these questions many times. Unfortunately there...
Using cpanel, Technical Analysts will get asked these questions many times. Unfortunately there...
ICANN Domain Ownership Verification Email
Changes that have occurred within the Registrars Accreditation Agreement (RAA- Registrar...
Changes that have occurred within the Registrars Accreditation Agreement (RAA- Registrar...
How to test your website on Ionblade's server with your computers "hosts" file
Why Change the Hosts File? Changing your hosts file is a temporary measure to preview your...
Why Change the Hosts File? Changing your hosts file is a temporary measure to preview your...

