Knowledgebase
How to test your website on Ionblade's server with your computers "hosts" file Print this Article
Why Change the Hosts File?
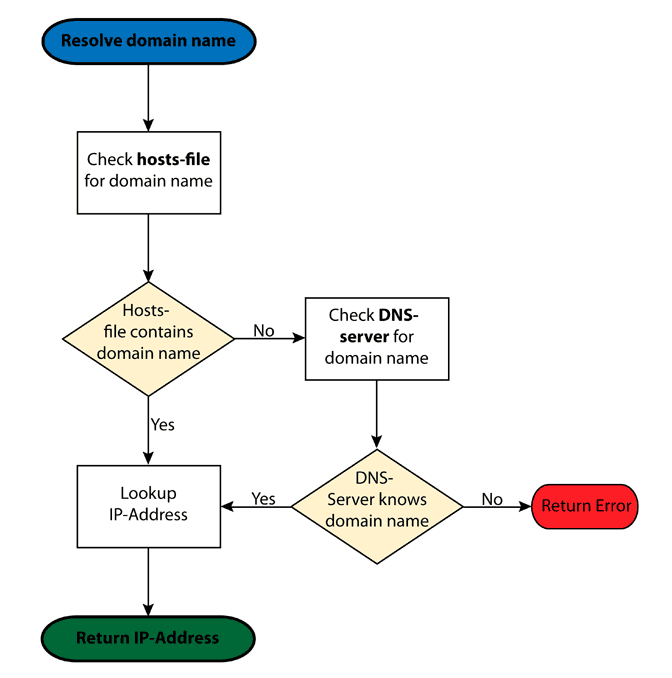
Changing your hosts file is a temporary measure to preview your site as it will load from your Ionblade server. Modifying the hosts file lets you tell your computer to not look at the parent DNS servers for information on how to reach your domain name. Instead, you are telling your computer that the domain name is located at a specific IP address, and to use the address in your hosts file when you type the domain into your browser.
This is very useful for development purposes, as you can work on the site your hosts file points to without disturbing traffic to an existing site.
Once you are done developing and/or testing your new site using this method, you can update your name servers for your domain to point to your Ionblade server, making the site live for all visitors. At that time you will want to also remove (or comment out) the line added to your hosts file, so you can be sure it's not masking any issues as the domain propagates to its new location.
Ionblade highly recommends changing your hosts file instead of any other methods for development purposes.It will provide you with the most stable testing environment, since it allows the site to be built on the intended domain name. Other methods, including the use of temporary URLs, can cause issues when changing the site's domain after development including elements not being loaded or SSL certificates errors due to mixed content. Numerous instances of your URL are used in database entries, for instance, and these may not be changed automatically when updating your site's URL.
Editing Your Hosts File
All operating systems will have a hosts file like our example:
- 127.0.0.1 localhost
- 50.28.87.32 www.example.com
- #50.28.87.32 www.anotherexample.com
Add the second line in this example to your hosts file, with the following edits:
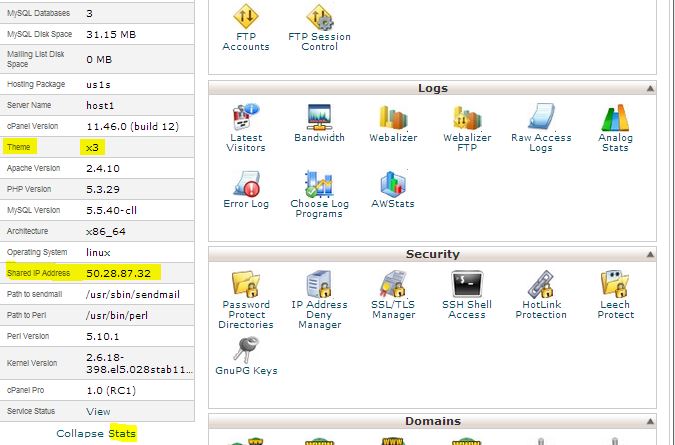
- Replace "50.28.87.32" with the server IP shown in your control panel (If your on Ionblade Shared hosting your IP may be 50.28.87.32). You can view this by accessing your cPanel and looking within the Account Information section, as illustrated below:

Note: In order to view this section within cPanel, your theme must be set to x3 and you may need to click Expand Stats and if you do not change your theme you may need to click Server Information. You can change your cPanel theme by clicking on the Change Style icon within the preferences section and selecting the x3 Theme. This information is shown on the bottom of your cPanel page and may require you to scroll down depending on your browser. - Replace "www.example.com" with your actual domain name.
You may deactivate a line by prefacing it with a "#" (as in the third line above). This will cause the line to be ignored when the file is utilized.
Flow chart to show how the hosts file works
Instructions
Editing Hosts Files in Your Operating System
The following instructions are advanced steps for different operating systems.
Windows
Windows users are able to edit their hosts file directly on their PC.
Windows 8
- Select the Start key and locate Notepad. (If you do not see it on your current Start page, type "Notepad" and press Enter).
Right click on Notepad. You will see options appear on the bottom portion of the Start Page.
Select Run as administrator.
Browse to C:\Windows\System32\Drivers\etc and open the hosts file.
Make the needed changes, as shown above, and close Notepad.
Save when prompted.
Windows 7 or Vista
- Browse to Start > All Programs > Accessories.
Right-click Notepad, and select Run as administrator.
Click Continue on the UAC prompt.
Click File > Open.
Browse to C:\Windows\System32\Drivers\etc.
Change the file filter drop-down box from Text Documents (*.txt) to All Files (*.*).
Select hosts, and click Open.
Make the needed changes, as shown above, and close Notepad.
Save when prompted.
Windows XP and Earlier
- Browse to Start > Find > Files and Folders.
Select the hosts file in your Windows directory (or WINNT\system32\drivers\etc).
Verify that the file is not "read only" by right-clicking it, and choosingProperties.
Open the file for editing with Notepad.
There should already be an entry for "localhost." Earlier versions of Windows have different formats for hosts file entries. Be sure to follow the same format as you find in your file when inserting the Ionblade IP and the domain name:
On Windows2000 and WindowsME, the order is IP address, hostname.
- Make the needed changes and close Notepad.
Save when prompted.
You may also need to reboot for the change to take effect. The next time you visit your domain, your browser will try to find the domain at the corresponding IP instead of looking up the IP through DNS.
Mac OS X
Follow the instructions below to edit your hosts file if you are running Mac OS X.
- Open the Terminal application. Start by typing Terminal on the Spotlight or by going to Applications > Utilities > Terminal.
Open the hosts file by typing in the Terminal that you have just opened:
Type your user password when prompted.
The hosts file contains some comments (lines starting with the # symbol), as well as some default hostname mappings (e.g. 127.0.0.1 localhost). Simply append your new mappings underneath the default ones. You can navigate the file using the arrow keys.
Replace "50.28.87.32" with the server IP that Ionblade provided you in your cPanel. Replace domain.com with your actual domain name. Additional domains, subdomains or addon domains (such as www.domain.com) can be added at the end of the line, separated by spaces.
When done editing the hosts file, press Control-o to save the file.
Press Enter on the filename prompt, and Control-x to exit the editor.
UNIX
On Unix-based systems, you can find the hosts file at /etc/hosts. Most distributions of Unix will have terminal located in the same location.
To open the terminal:
- Go to Menu.
Select Applications.
Choose Accessories.
Select Terminal.
To edit the hosts file:
Unix users can edit hosts files in the same process as Mac users. Please refer to steps 2 through 4 in the Mac section above.
DNS Flush
Once you have modified your hosts file, it is recommended that you flush your DNS so that the new changes can be implemented more swiftly. DNS flushing must be done using command line. Depending on your computer's OS, there will be different commands.
For more information please see the following related article Flush DNS.
Unix users can edit hosts files in the same process as Mac users. Please refer to steps 2 through 4 in the Mac section above.
Test Connection Using Ping
Once you have modified your hosts file and Flushed your DNS, you can test if your computer is connecting to the right IP by doing a ping.
Windows
To ping a domain on a Windows-based machine:
- From the Windows Start menu, select Run.
- Type cmd.
- Type the command ping followed by the domain name you wish to ping. For example:
C:>ping exampledomain.com
- Press Enter.
- Once the process is complete make sure the IP for your Ionblade server is returned with each ping.
Mac
To ping a domain on an Apple-based machine:
- In the Spotlight search feature, locate Network Utility.
- If you do not have the Spotlight search feature on your device, try locating the Network Utility by navigating to Applications > Utilities.
- Select the Ping tab.
- Enter the domain name you wish to ping.
- Click Ping.
- Once the process is complete make sure the IP for your Ionblade server is returned with each ping.
Linux
To ping a domain on a Linux-based machine:
- Access telnet/terminal window.
- Type the command ping, followed by the domain name you wish to ping. For example:
ping exampledomain.com
- Press Enter.
- Once the process is complete make sure the IP for your Ionblade server is returned with each ping.
Was this answer helpful?
Related Articles
Using cpanel, Technical Analysts will get asked these questions many times. Unfortunately there...
Changes that have occurred within the Registrars Accreditation Agreement (RAA- Registrar...
Parked Domain A parked domain is a domain thats not being used or does not have its own website...

