Knowledgebase
Email Accounts Print this Article
Overview:
Use this interface to add, manage, and delete email accounts.

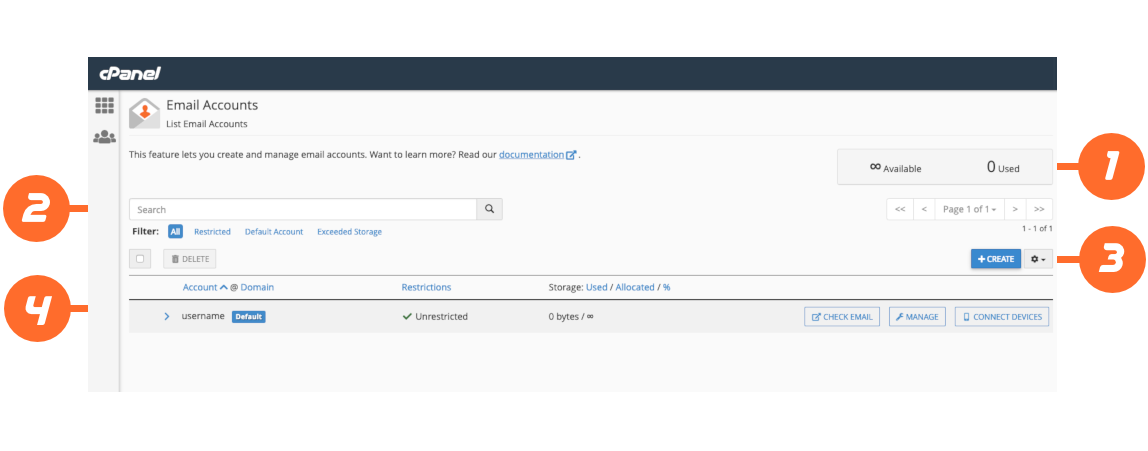
This interface consists of the following:
- Email account quota status.
- The search bar and its filters.
- Create an Email Account.
- Email Accounts table.
- For more information about Webmail, including checking email in your browser and selecting a webmail application, read our Webmail documentation.
- To set up a mail client for your email account, read our Set Up Mail Client documentation.
Email account quota status
This area of the interface provides details about your email account quotas. It displays the total number of email accounts you can create. It also lists the current number of created email accounts.
- The infinity icon (∞) indicates that your account has an unlimited quota.
- The total number of accounts does not include the cPanel account’s default email account.
- Some hosting providers allow their users to purchase quota increases. When this is available, the interface will display Buy More in this section.
Create an Email Account
To create a new email account, click Create. A new interface will appear. It displays the account creation settings, as well as your account’s quota status. For more information, read our Create an Email Account documentation.
Email accounts
This table lists all the email accounts on your cPanel account, and lets you perform several actions.
The Email Accounts table
This table displays the following information:
-
Select the checkbox (
 ) to select an email account for bulk actions. You can also select all email accounts using the checkbox at the top of this table. For example, use this to select several email accounts, and then click Delete to remove them.Note:
You cannot use this action to select the cPanel account’s default account.
-
Click the more (
 ) icon to display more information about an email account. This will display the following information and actions:
- Restrictions — The account’s restrictions, if any exist.
- Delete — Click to permanently delete all mail and data for the account. After you click Delete, a confirmation message will appear. Click Delete to remove the account.
Warning:
You cannot undo this action.
Note:This action does not appear for the cPanel account’s default account.
-
Account @ Domain — Click to perform the following actions:
- Click Account to sort the list alphabetically by account name.
- Click Domain to sort the list alphabetically by domain name.
-
Restrictions — Whether there is a restriction for the account.
-
Storage: Used / Allocated / % — Click Used, Allocated, or the percent symbol (%) to sort the table by that item. These labels are the amount, the limit, and the percentage of disk space data quota usage.
-
The actions column — Click to perform the following actions:
- Check Email — Click to check an email account’s mail. A new interface will appear that displays the account in Webmail.
- Manage — Click to edit an existing email account in cPanel’s Manage Email Accounts interface (cPanel >> Home >> Email >> Manage Email Accounts). A new interface will appear.
- There are two types of email accounts: the Default email account, and all other email accounts.
- There are separate interfaces for both types of email accounts.
- Connect Devices — Click to configure mail client access in cPanel’s Set Up Mail Client interface (cPanel >> Home >> Email >> Set Up Mail Client). A new interface will appear.
Additional actions
You can perform several additional actions while you use the email accounts table:
-
Use the search bar to find a specific email account. You can also filter the table’s results by one the following settings:
- Restricted — Display only the accounts with restrictions.
- Default Account — Display only the cPanel account default (
 ) account.
- This account’s name is the same as the username that your hosting provider used to create your account.
- For more information about the cPanel account default address, read our Manage Email Accounts documentation
- Exceeded Storage — Display only the accounts that are over their storage quotas.
-
Click a column’s heading to sort the results of the table by that heading. The table will sort the list in ascending or descending order.
-
Click the gear icon (
 ) to select the number of entries you want to display per page. You can also refresh the table results.
Was this answer helpful?
Related Articles
Overview This feature allows you to review details about email delivery attempts for your...
How do I log into webmail? Access your domain at port 2096. To do so, you will...
Overview cPanel’s email authentication features provide information about outgoing messages....
Overview This feature allows you to route a domain's incoming mail to a specific server. Changes...
Log sender rates in the exim mainlog This option allows you to log sender rates in the Exim mail...

