Knowledgebase
Force-loading HTTPS Print this Article
Adding custom code to force the redirect
In some special cases, it may be necessary for you to create your own custom configuration file to force the redirect from HTTP to HTTPS. To create this file, you must log in to your server via FTP or SSH as described below.
Adding custom code is only necessary if your website requires specific code to force the redirect. As stated above, your site will automatically redirect when you add an SSL certificate in the panel, so adding custom rules is only necessary if your website requires them.
Using the panel's redirect service to force HTTPS
It is not possible to use the panel's Redirect service to force your site to load the HTTPS version of its URL.
This is because the HTTPS service only functions when the site is Fully Hosted, and the Redirect service removes hosting from the domain.
What configuration file do I need to create?
If your site requires custom code to force the redirect to HTTPS, you will need to update a configuration file for your domain on the server. The name and location of the custom configuration file is different depending on what type of server your site is running on. This would either be Apache or Nginx.
For Apache servers
In this case, you'd just need to create an .htaccess file for your site.
-
Where should the .htaccess file be created?
The .htaccess file should be located in your website's primary directory. Change username to your Shell user and example.com to your website. For example:
/home/username/example.com directory.
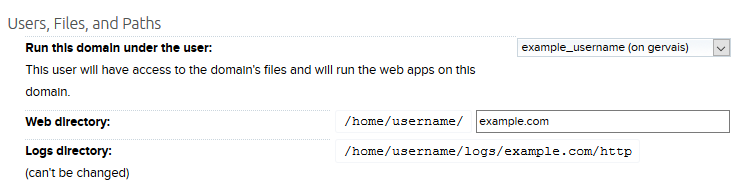
You can also confirm your site's web directory in the panel.
- Navigate to the Manage Domains page.
- Click the Edit link to the right of your domain under the Web Hosting column.
- Here you'll see your site's web directory.

Please note that your FTP client must be configured to show hidden files. If not, you will not see the .htaccess file.
What to change in the examples below?
The examples below can be entered into your .htaccess file exactly as shown.
Only if the example contains a URL in bold should you change that to your actual URL. For example, if you see the domain example.com, change this to your own domain name.
Forcing the domain to serve securely using HTTPS (for any site)
The following forces any http request to be rewritten using https. For example, the following code forces a request to http://example.com to load https://example.com. It also forces directly linked resources (images, css, etc.) to use https:
RewriteEngine On
RewriteCond %{HTTPS} !=on
RewriteRule ^(.*)$ https://%{HTTP_HOST}%{REQUEST_URI} [L,R=301,NE]
Header always set Content-Security-Policy "upgrade-insecure-requests;"
If this isn't working for you, first check your line endings. Copy/paste from your web browser into a text editor may not work right, so after pasting into your text editor you should delete each line break and add it back in (line break = return key).
Forcing HTTPS with WordPress
If your .htaccess file already contains some default WordPress code, enter the following above or below that code. Never enter code inside of the comment tags that start and end with:
- # BEGIN WordPress
# END WordPress
It's possible for a visitor to enter in a direct HTTP URL on your WordPress site, even when an SSL certificate is active. To force any HTTP request to redirect to HTTPS, you can add code to your WordPress .htaccess file. There are two code options below for you to use. The first should work as shown, but if not, try option two instead.
Option #1
RewriteEngine On
RewriteCond %{HTTPS} !=on
RewriteRule ^(.*)$ https://%{HTTP_HOST}%{REQUEST_URI} [L,R=301,NE]
Header always set Content-Security-Policy "upgrade-insecure-requests;"
Full example including the default WordPress code
Below is what your .htaccess file looks like with both the new HTTPS code and existing WordPress code.
RewriteEngine On
RewriteCond %{HTTPS} !=on
RewriteRule ^(.*)$ https://%{HTTP_HOST}%{REQUEST_URI} [L,R=301,NE]
Header always set Content-Security-Policy "upgrade-insecure-requests;"

# BEGIN WordPress
# The directives (lines) between `BEGIN WordPress` and `END WordPress` are
# dynamically generated, and should only be modified via WordPress filters.
# Any changes to the directives between these markers will be overwritten.
<IfModule mod_rewrite.c>
RewriteEngine On
RewriteBase /
RewriteRule ^index\.php$ - [L]
RewriteCond %{REQUEST_FILENAME} !-f
RewriteCond %{REQUEST_FILENAME} !-d
RewriteRule . /index.php [L]
</IfModule>
# END WordPress
Option #2
In this example, make sure to change example.com to your actual domain name.
RewriteEngine On
RewriteCond %{SERVER_PORT} 80
RewriteRule ^(.*)$ https://www.example.com/$1 [R=301,L,NE]
Header always set Content-Security-Policy "upgrade-insecure-requests;"
Full example including the default WordPress code
Below is what your .htaccess file looks like with both the new HTTPS code and existing WordPress code.
RewriteEngine On
RewriteCond %{SERVER_PORT} 80
RewriteRule ^(.*)$ https://www.example.com/$1 [R=301,L,NE]
Header always set Content-Security-Policy "upgrade-insecure-requests;"

# BEGIN WordPress
# The directives (lines) between `BEGIN WordPress` and `END WordPress` are
# dynamically generated, and should only be modified via WordPress filters.
# Any changes to the directives between these markers will be overwritten.
<IfModule mod_rewrite.c>
RewriteEngine On
RewriteBase /
RewriteRule ^index\.php$ - [L]
RewriteCond %{REQUEST_FILENAME} !-f
RewriteCond %{REQUEST_FILENAME} !-d
RewriteRule . /index.php [L]
</IfModule>
# END WordPress
For Nginx servers
If your site is running on a VPS or Dedicated server, and you have manually configured it to run Nginx instead, you need to create a redirects.conf file.
-
This redirect forces your site to load the HTTPS version of your site to ensure your visitor's connections are encrypted. Add the following code to your redirects.conf file.
if ($server_port = 80) {
  rewrite ^/(.*)$ https://example.com/$1 permanent;
}
Was this answer helpful?
Related Articles
Overview: A hotlink occurs when someone embeds content from your site in another site and uses...
Overview: The IP Blocker interface allows you to block access to your site for one or more IP...
Overview: The Leech Protection interface allows you to detect unusual levels of activity in...
Overview: Important: This functionality is experimental. It may change in future...
Overview: Warning: We strongly recommend that you enable ModSecurity™ for all of your...
